Voicemail
You configure voicemail using the Messages page. This page has two tabs for handling voicemail:
• Messages — see “Messages” below.
• Settings — see “Voicemail Settings” on the next page.
To display the Messages page, click the Messages icon at the top of the page:

Messages
The Messages tab allows you to manage your new, saved, and deleted voicemail, as well as greetings and other settings.
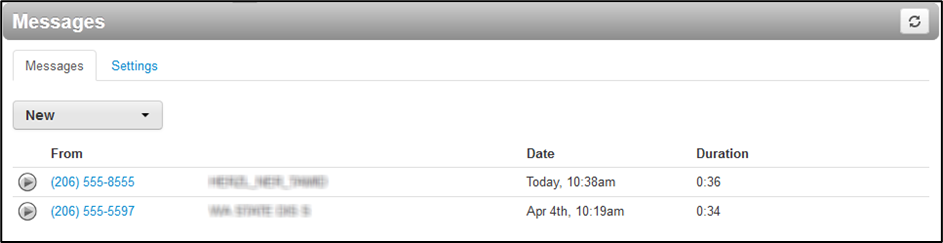
Like the Home page, you can play messages, click a number to call it back, and download, save, forward, and delete messages. To see all the controls available, hover the mouse pointer over a message.
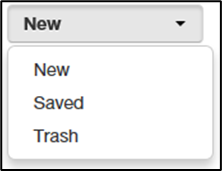
The New drop-down list allows you to review New, Saved, and Trash (recently deleted) messages.
Voicemail Settings
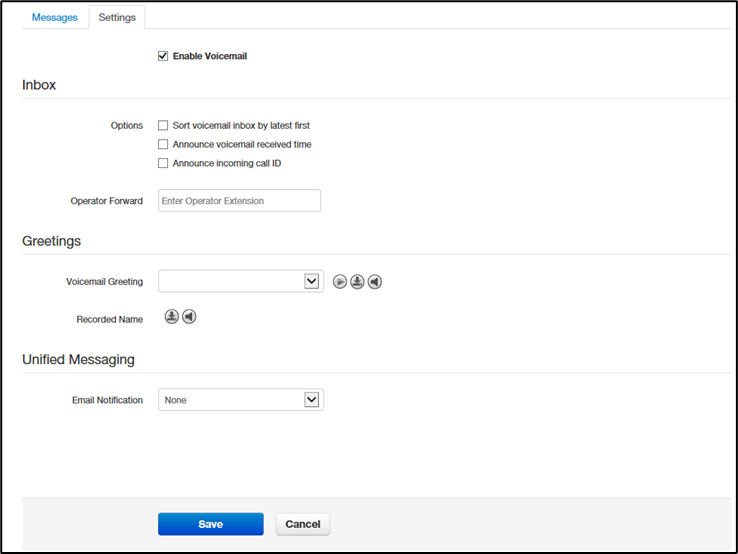
Clicking the Settings tab displays options for controlling your voicemail order, timestamps, greetings, and voicemail to email.
|
Field |
Description |
|
Enable Voicemail check box |
Enables (check) or disables (uncheck) voicemail. |
|
Inbox |
These options affect audio voicemail (calling in) but not the portal. · Sort Voicemail inbox by latest first = plays your newest messages first. · Announce voicemail received time = plays the timestamp of the message. · Announce incoming call ID = plays the caller ID number if available. · Operator Forward = option to press 0 in a mailbox greeting and be directed elsewhere. |
|
Greetings |
Allows you to select an active voicemail greeting, listen to it, and record a new greeting. · To select the active voicemail greeting, click it from the pull-down menu and click Save. · To listen to a selected greeting on your PC, click the play button: · To record a greeting, see “Recording a Greeting”. |
Recording a Greeting
Ø To record a greeting
1. From the Settings tab of the Messages page, click the speaker icon ![]() .
.
A Manage Greetings page similar to the one below appears.

2. Next to New Greeting, click Record.
The Browse button changes to a Call me at field.
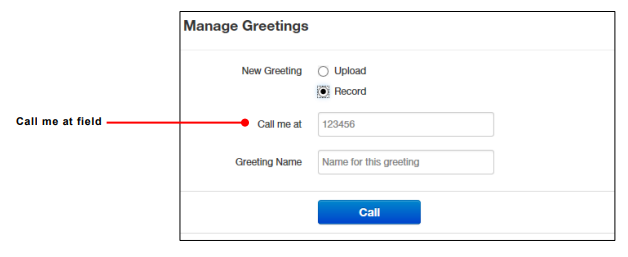
3. In the Call me at field, enter a number to call. This can be an extension or a telephone
number such as your cell phone.
4. In the Greeting name field, enter a name for this greeting.
5. Click the Call button.
6. At the prompt, record the new greeting. When you finish the greeting, press #.
7. Click Add Greeting at the bottom of the Manage Greetings page, and then click Done to
close the page.
Uploading a Greeting
Ø To upload a greeting
- From the Settings tab of the Messages page, click the speaker icon
 .
. - Hover over a greeting. Options appear for editing, deleting, or renaming the greeting.
- Next to New Greeting, click Upload.
- Click the Browse button.
- In the Choose File to Upload dialog box, select a WAV or MP3 recording from your PC,
and then click Open.
The path and file name appear in the Browse field. - Click Upload.
- Click Add Greeting at the bottom of the Manage Greetings page, and then click Done to
close the page
Recorded Name
If your company has a dial-by-name directory, you must record your name for the directory
to be found. You can click the play button to listen to your current name recording on your
PC, or click the speaker button to record or upload a new name recording.
No Comments