CloudPBX Phone System User Guide
Welcome to the Cloud PBX User Guide. Your Cloud PBX combines the best in traditional
phone system features with modern Internet Protocol (IP) capabilities. In this guide, you will
learn how to perform many common tasks on your phone, as well as make full use of your
web portal
- Star Codes and Features
- USING YOUR DESK PHONE
- Making Calls
- Making International Calls
- Extension Dialing
- Intercom
- Receiving Calls
- Voicemail
- Handling Calls
- Rebooting a Grandstream GXP2170
- USING THE USER WEB PORTAL
- Accessing the Portal
- Desktop Call Control
- Home
- Voicemail
- Time Frames
- Answering Rules
- Updating Phone Buttons (Speed Dials & BLF)
- Mobile and Desktop Apps
- Office Manager
Star Codes and Features
Call Forwarding from Star Codes - Call forwarding from star codes only forwards to a device, specifically not a user, meaning it will not respect the answering rules of the forward user. If you forward to '101', the system will only forward to the specific extension 101, not 101a or 101m.
| Star Code | Feature Description |
|---|---|
| *** | Dynamically Park a Call (in the 701-709 range) |
| *{parking lot} | Park a Call (to a specified park ext) |
| *34 | Site Pickup - Answer a Call that is ringing within the same site |
| *35{ext} | Extension Pickup - Answer a Call that is ringing at another extension |
| *36 | Domain Pickup - Answer a Call that is ringing within the same domain |
| *37 | Department Pickup - Answer a Call that is ringing within the same department |
| *38 | Self Pickup - Moves an active call to another extension owned by the Same User. (Dial from the idle extension to steal the active call) |
| *40 | Activate Call Forwarding (This feature will only forward to Device or External Number; it does not forward to Users. Forwarding to a user such as an Auto-Attendant must be done in the portal.) |
| *41 | Set Forward Busy Destination (This feature will only forward to Device or External Number; forwarding to a user such as an Auto-Attendant must be done in the portal.) |
| *42 | Set Forward No Answer Feature |
| *44 | Hotdesking (Log In) - Requires User Login and Password |
| *45 | Disable Call Forwarding (for Hotdesking). This star code is deprecated and no longer needed for Hotdesking. |
| *46 | Hotdesking (Log Out) - Requires Password of current logged-in user |
| *48 | Ask the caller to enter a PIN before connecting the call |
| *49 | Ask the caller to enter the extension # before connecting the call |
| *50{ext} | Auto Answer/Intercom (3 or 4 Digit Ext) This feature does not work with SLA. |
| *55{Parking Lot} | Retrieve a call from a Call Park Queue |
| *61 | To Voicemail - Unauthenticated (This feature is disabled by default. To activate, open a Support Ticket) |
| *62 | To Voicemail - Password Only |
| *66<10 or 11 Digit phone number> | Route Call Off-Net. Instead of staying on the Network, this feature will route a call out through a carrier. |
| *67<10 or 11 Digit phone number> | To Connection w/ Privacy DID 11 Digit |
| *67{ext} | To User w/ Privacy |
| *69 | Call Return |
| *72<10 or 11 Digit phone number or Extension number> | Set Forward Destination (This feature will only forward to Device or External Number; it does not forward to Users. Forwarding to a user such as an Auto-Attendant must be done in the portal.) |
| *73 | DeActivate Forward |
| *74 | Activate Night Mode (Requires Setup) |
| *75 | DeActivate Night Mode |
| *78 | Activate Do Not Disturb |
| *79 | Deactivate Do Not Disturb |
| *80 | Start Call Recording |
| *81 | Stop Call Recording |
| *82 | Pause Call Recording for 1 minute or until *83 (Unpause Call Recording), whichever comes first |
| *83 | Resume Call Recording from a paused state as a result of *82 |
| *86<10 or 11 Digit phone number> | Keep the call on-net. This attempts to avoid the PSTN for calls between domains. |
| *88 | Make Agent Available for all Queues the Agent is a member of (Online) |
| *89 | Make Agent Unavailable for all Queues the Agent is a member of (Offline) |
| *90 | Activate Forward Busy (This feature will only forward to Device or External Number, forwarding to a user such as an Auto-Attendant must be done in the portal) |
| *91 | DeActivate Forward Busy |
| *92 | Activate Forward No Answer (This feature will only forward to Device or External Number, forwarding to a user such as an Auto-Attendant must be done in the portal.) |
| *93 | DeActivate Forward No Answer |
| *97{ext} | Transfer to a 4-digit Extension |
| *98{ext} | Transfer to a 3-digit Extension |
| *99 | Transfer to Self |
| Shortcut | Feature Description |
|---|---|
| 7{ext} | Transfer a call directly to voicemail (3 or 4 digit extension) |
| 71[0-9] | Transfer a call to a Call Park Queue in the 710-719 Range for Parking without a Callback |
| 72[0-9] | Transfer a call to a Call Park Queue in the 720-729 Range for Parking with Callback |
| 99{ext} | Auto Answer/Intercom (3 or 4 digit extension) This feature does not work with SLA. |
| 099 | Invoke the Account Code feature |
| 988 | National Suicide Prevention Hotline |
| 5000 | Unregistered Login to VMail (prompted for account no and password) |
| 5001 | Registered Login to VMail (prompted for password only) |
| 5002 | Hot Desking Sign-In |
| 5003 | Request the User's PIN then provide 2nd dialtone (useful for phones in public spaces) |
USING YOUR DESK PHONE
While there are many different models of desk
phones, they largely all work the same way. In this
chapter, you will learn how to use common
functions of your phone.
Making Calls
Making a call with your phone does not require a leading 9. You can dial on-hook or offhook.
➢ To dial on-hook
1. Dial the phone number.
2. Pick up the handset, headset, or speaker.
➢ To dial off-hook
1. Pick up the handset, headset, or speaker.
2. Dial the phone number.
Calls to the US and Canada are all dialed using 10 or 11 digits. Local calls can be dialed
using 7 digits.
Making International Calls
➢ To dial an international call
1. Dial the international call code 011.
2. Dial the country code.
3. Dial the local number.
International calling is commonly disallowed to prevent toll fraud.
Extension Dialing
Extensions on your system can be dialed using their 3-to-4 digit extension or by pressing the
button on your phone corresponding to the desired extension.
Intercom
VoIP phones provide an intercom feature that allows you to instantly connect to other
phones within your office. Intercom functionality is ideal for announcing visitors or asking a
quick question.
When one phone intercoms another extension, it does not ring the other phone. Instead, the
other phone will beep, and then its microphone and speaker turn on.
➢ To intercom
1. Dial 99{ext}. For example, to intercom extension 100, dial 99100. Or dial 99 and press the Extension
BLF
On Phones that have BLF (Where you can see if someone's phone is on a call or busy with red light next to their name), you can simply dial 99 then press the button for who you want to intercom with.
Receiving Calls
When a call comes in, you can answer it via a headset, speakerphone, or handset.
➢ To answer a call using a handset
– Lift the handset off-hook.
➢ To answer a call using a speakerphone
– Press the Speaker button.
➢ To answer a call using a headset
– Usage depends on how the headset is connected. Often, you'll press the button on
the headset or press the headset button on the phone.
Voicemail
Accessing Voicemail
➢ To access voicemail
1. Press the Messages button on your phone to access your voicemail box, or dial 5001 if
you can not identify the voicemail button.
2. If you subscribe to multiple mailboxes, a list of mailboxes may appear. Select the mail box
you want to access.
3. When prompted, enter your voicemail pin, and then press #
➢ To access another person’s mailbox
1. Dial 5000.
2. When prompted, enter the other person’s extension number.
3. Enter the voicemail PIN of the other person’s mailbox, followed by #.
Setting Up Your Mailbox
The first time you log in to your mailbox you are walked through recording your name for the
directory and recording your personal greeting.
The name recording is for the dial-by-name directory, so when someone enters the first
three letters of your last name, it will play back your name recording.
The greeting plays when your mailbox is reached. It is very important to make a custom
message, as many callers will not leave messages at mailboxes that have generic greetings.
Alternate Greetings
Your mailbox supports multiple greetings for different scenarios like business trips and
holidays.
➢ To record an alternate greeting
1. From your mailbox, press 6 for greetings, and then press 1 to record an alternate greeting.
2. When prompted for the greeting number press 2 for your next alternate greeting (1 is your
default greeting).
3. After your recording is completed, select the active greeting by selecting option 3 in the
greetings menu.
Voicemail Tree

Handling Calls
Your cloud PBX features various ways to move calls around, including attended transfer,
unattended (blind) transfer, voicemail transfer, park, and more. In this section, references to
BLFs are the 1-touch buttons to extensions common at front-desk phones.
Blind Transfer
Blind transfer goes straight to the recipient.
1. Be on the call you want to transfer.
2. Press Transfer.
3. Press the Blind softkey. (if there is no Blind softkey see directions for new firmware)
4. Enter the extension of the recipient or the recipient’s BLF.
Transfers to External Numbers
A transfer can also go to an external number such as a cell phone. Follow the transfer
directions above but instead of dialing an extension, dial a 10 digit phone number.
Voicemail Transfer
Voicemail transfer goes straight to the recipient’s voicemail box without ringing the
recipient’s phone.
➢ To perform a voicemail transfer
– Perform a blind transfer with a 03 prefix before the extension. For extension 111’s
voicemail, for example, blind transfer to 03111.
Park and Hold
On your phone system, hold is a local function. This means a call held on your phone cannot
be picked up at another station. Park is a system-wide function. This means a call parked at
one phone may be picked up by any phone.
➢ To park a call
1. Dial *** in an active call from any phone. The system says, “The call is parked at 7xx.”
2. Hang up.
To retrieve the parked call, dial 7xx where xx is the number stated by the system.
Directed Call Pickup
Directed call pickup (DCP) allows you to answer a call ringing at another station.
➢ To perform a directed call pickup
– Dial *35ext. If 111 is ringing, for example, dial *35111 to pick up that call.
Phones with BLFs to the ringing station can also dial *35 then press the corresponding BLF.
3-Way Conference
➢ To make a 3-way conference
1. Call or be called by the first participant in the conference.
2. Press the Conference key/softkey, and then dial the second participant.
3. After the second participant picks up, press Conference again to connect everyone.
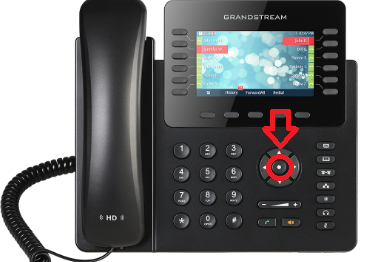
Rebooting a Grandstream GXP2170
This guide shows two easy ways to reboot your GXP2170: from the phone’s menu, or by power-cycling it. Use either method, both do the same thing.
Before you start
-
Finish any active calls. Rebooting will disconnect calls.
-
Rebooting does not erase settings or voicemails. It just restarts the phone.
-
If you use a wired headset or sidecar (EXT), leave them plugged in.
Method A: Reboot from the phone’s menu (preferred)
-
Press the Menu key (the center round button).

-
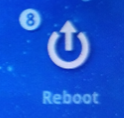
Select Reboot. (you may use arrows or just press the number # 8 on dial pad)

- When Highlighted press the Menu key (the center round button) to select it.
-
When asked to confirm, choose Yes.
-
The screen will go dark and the phone will restart. (it may appear as its not doing anything, but give it about 15 seconds)
Method B: Power-cycle the phone (unplug/replug)
If your phone uses Power over Ethernet (PoE)
-
Trace the network cable from the back of the phone to the wall jack or switch.
-
Unplug that network cable from the back of the phone.
-
Wait 10-15 seconds.
-
Plug the same cable back into the LAN port on the phone (not the PC pass-through port).
If your phone uses a power adapter (wall power)
-
Unplug the round power plug from the back of the phone or unplug the power brick from the wall.
-
Wait 10-15 seconds.
-
Plug it back in firmly to the phone and power outlet.
After the reboot
-
The screen will show the Grandstream logo, then your extension.
-
Line keys will light as the phone finishes registering.
-
You can place/receive calls once the line keys are solid and your name/extension is shown.
If the phone doesn’t come back up
-
Check the network cable is in the LAN port (not “PC”).
-
For power adapter: verify the power brick is firmly connected at both ends and the outlet has power.
-
Look for on-screen messages like “Not Registered”; if you see this, note it for support.
When to contact IT/Support
-
The phone shows “Not Registered” or can’t make/receive calls after reboot.
-
You see repeated reboots or error messages.
-
Your sidecar (EXT) or headset doesn’t power back on.
Provide your extension number, whether you used PoE or power adapter, and what you saw on the screen after the reboot.
USING THE USER WEB PORTAL
Each extension of your Cloud PBX system has
access to a powerful web portal for managing
voicemail, call routing, and more.
Accessing the Portal
To access the web portal
1. Start a web browser.
2. Go to https://pbx.precision-computer.com
3. At the login page:
• Enter your Login Name (ext@customerpbxname) and Password. If you do not know your Login Name or Password use the applicable Forgot Link.
• If you never received these details use the New User link

Desktop Call Control
Desktop call controls appear when making or receiving a call. These controls allow you to see who is calling and manage a current call.
Incoming Calls
Incoming calls appear in a window in the portal. This window shows the caller ID name and number, along with Reject and Answer buttons.
• Selecting Reject sends the call to voicemail if available. The Answer button may not be available, depending upon your handset model.
 Example of an Incoming Call
Active Calls
An active call window that displays the caller ID and call time. The three controls at the bottom of the window let you hold, hang up, or transfer the call. If you select transfer, a field appears for entering the extension of the recipient. If you prefix the recipient’s extension number with 03, the call goes straight to voicemail.

Home
The Home page of your portal provides an at-a-glance view of everything going on with your extension. Table 2 1 describes the areas on the Home page.


Figure 2 3. Example of Home Page
Table 2 1. Fields in the Home Page
|
Field |
Description |
|
New Messages |
Shows new messages. You can play messages, click to call back, download, save, and delete. To see all the controls, hover over the message. |
|
Recent Call History |
Color-coded icons show your recent calls. · Green icon = outbound call. · Red icon = missed inbound calls. · Blue icon = inbound received calls. To call back a number, click the phone number. |
|
Status Message |
Allows you to enter a status message that appears to other users of the portal. |
|
Active Answering Rule |
Your extension can have multiple answering rules. For example, you might ring your phone in one mode or forward to your cell in another mode. In this field, you can which answering rule is the active rule. |
|
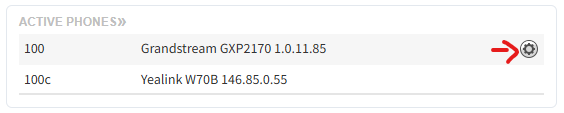
Active Phones |
Your extension may have multiple phones (for example, one in the office and one at home). This field shows which handsets are currently online. |
Voicemail
You configure voicemail using the Messages page. This page has two tabs for handling voicemail:
• Messages — see “Messages” below.
• Settings — see “Voicemail Settings” on the next page.
To display the Messages page, click the Messages icon at the top of the page:

Messages
The Messages tab allows you to manage your new, saved, and deleted voicemail, as well as greetings and other settings.

Like the Home page, you can play messages, click a number to call it back, and download, save, forward, and delete messages. To see all the controls available, hover the mouse pointer over a message.
The New drop-down list allows you to review New, Saved, and Trash (recently deleted) messages.

Voicemail Settings
Clicking the Settings tab displays options for controlling your voicemail order, timestamps, greetings, and voicemail to email.

|
Field |
Description |
|
Enable Voicemail check box |
Enables (check) or disables (uncheck) voicemail. |
|
Inbox |
These options affect audio voicemail (calling in) but not the portal. · Sort Voicemail inbox by latest first = plays your newest messages first. · Announce voicemail received time = plays the timestamp of the message. · Announce incoming call ID = plays the caller ID number if available. · Operator Forward = option to press 0 in a mailbox greeting and be directed elsewhere. |
|
Greetings |
Allows you to select an active voicemail greeting, listen to it, and record a new greeting. · To select the active voicemail greeting, click it from the pull-down menu and click Save. · To listen to a selected greeting on your PC, click the play button: · To record a greeting, see “Recording a Greeting”. |
Recording a Greeting
Ø To record a greeting
1. From the Settings tab of the Messages page, click the speaker icon ![]() .
.
A Manage Greetings page similar to the one below appears.

2. Next to New Greeting, click Record.
The Browse button changes to a Call me at field.
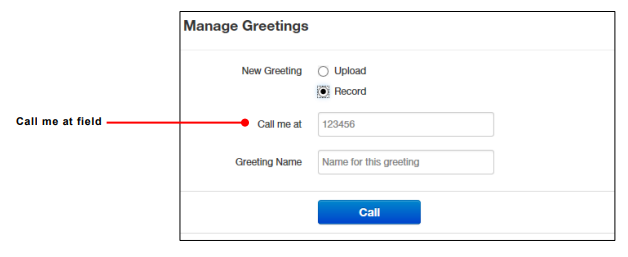
3. In the Call me at field, enter a number to call. This can be an extension or a telephone
number such as your cell phone.
4. In the Greeting name field, enter a name for this greeting.
5. Click the Call button.
6. At the prompt, record the new greeting. When you finish the greeting, press #.
7. Click Add Greeting at the bottom of the Manage Greetings page, and then click Done to
close the page.
Uploading a Greeting
Ø To upload a greeting
- From the Settings tab of the Messages page, click the speaker icon
 .
. - Hover over a greeting. Options appear for editing, deleting, or renaming the greeting.
- Next to New Greeting, click Upload.
- Click the Browse button.
- In the Choose File to Upload dialog box, select a WAV or MP3 recording from your PC,
and then click Open.
The path and file name appear in the Browse field. - Click Upload.
- Click Add Greeting at the bottom of the Manage Greetings page, and then click Done to
close the page
Recorded Name
If your company has a dial-by-name directory, you must record your name for the directory
to be found. You can click the play button to listen to your current name recording on your
PC, or click the speaker button to record or upload a new name recording.
Time Frames
Time frames allow you to control the scheduling of the system. You configure time frames
using the Time Frames page. To display this page, click the Time Frames icon at the top of
the page:

Three common time frames are:
• Open Hours (for example, M-F 9am-5pm)
• Holidays (Independence Day, Thanksgiving, New Year’s, and so on)
• Closed Hours (all other times)
Time frames can be both shared (system-wide and set by the administrator) or personal to
your extension. You can add a time frame to your extension by clicking the Add Time Frame.

Ø To add time frames
1. From the Time Frames page, click Add Time Frame.
The Add a Timeframe page appears.

2. In the Name field, enter a name for this time frame.
3. Next to When, select the time period when the time frame will be applied:
– Always = select this option if the time frame will always be applied. Click Save to complete the procedure.
– Days of the week and times = select this option to select days and times when the time frame will be applied. Proceed to “If you select Days of the week and times” on page 23.
– Specific dates or ranges = select this option to specify a specific date or range of dates. Proceed to “If you select Specific dates or ranges” on page 27.
If you select Days of the week and times
Options appear for selecting days and times when the time frame will be applied.

1. Using the check boxes next to the name of each day of the week, check the days when the time frame will be applied. A blue line to the right of checked day shows the default hours for this time frame (9:00 AM through 5:00 PM).

2. To change the start time, drag the button on the left side of the blue bar either to the left to begin the start time earlier or to the right to begin the start time later.

3. To change the end time, drag the button on the right side of the blue bar either to the left to shorten the end time or to the right to lengthen the end time.
![]()
Hint: To fine-tune start and end times, click start time or end time button, and then use the left and right arrow keys on your keyboard to change the time in 5-minute increments.
4. By default, each day is made up of one time period. However, you can use the icon to define two time periods per day. For example, the figure below shows a setup for an office that answers calls in the morning and afternoon, and then transfers calls to an answering service over lunch, on Monday through Friday. By doing this, you would create two time frames (for example, one from 8 to noon and another from 1:00 to 5:00 PM).

5. Click Save to save your selections.
The time frame appears as a row on the Time Frames page.

Hint: Moving the pointer over the blue text in the Description column shows the settings for that timeframe.

If you select Specific dates or ranges
Fields appear for entering dates or ranges

1. Click in the left field, and then select a starting date and time from the pop-up calendar.

2. Click in the right field, and then select an ending date and time from the pop-up calendar.
3. To specify additional ranges, click the icon to display another row of fields, and then repeat steps 1 and 2 in the new fields. Repeat this step for each additional date or range you want to specify. To delete a date or range, click the icon next to the appropriate row.

4. Click Save to save your selections.
The time frame appears as a row on the Time Frames page.

Hint: Moving the pointer over the blue text in the Description column shows the settings for that timeframe.

Answering Rules
After you set up your time frames, you can create different answering rules for your time frames. You configure answering rules using the Answering Rules page. To display this page, click the Answering Rules icon at the top of the page:

The left side of the Answering page has a Rings for n seconds drop-down list that allows you to specify the maximum ring time (one ring is generally 5 seconds). When that time expires, the caller will be forwarded to the Call Forward When Unanswered rule if defined; otherwise, the caller will be forwarded to voicemail if enabled. The right side of the Answering Rules page has buttons for adding answering rules, and specifying allowed and blocked numbers.

Shows examples of answering rules. In this figure:
· The extension has a rule to simultaneously ring many desk phones during Open Hours.
· Cell Forward rings many desk phones and a cell phone simultaneously.
· Holiday and closed hour rules go straight to voicemail.
The active rule is the topmost rule that matches the conditions in the corresponding time frame. For example, the time is around 1pm on Friday, so both Open Hours and Cell Forward rule match the time/day condition, but Open Hours is active because it is the topmost rule. You can change the order by using the arrows at left of each rule to drag the rules.
Sample Answering Rules
Ø To add an answering rule
1. From the Answering Rules page, click Add Rule.
The Add an Answering Rule page appears. From this page, you can create rules to screen callers, forward calls, and ring multiple numbers simultaneously.

Add an Answering Rule Page
2. Complete the fields in the Add an Answering Rule page (see Table 2‑3).
3. Click Save
Fields in the Add an Answering Rule Page
|
Field |
Description |
|
Time Frame |
Select the time frame when this answering rule will apply. |
|
Do not disturb |
No phone rings, goes straight to voicemail if available. |
|
Call screening |
Prompts caller to say their name, lets you screen the call before accepting. |
|
Call Forwarding Always |
Immediately forwards to the number specified. See “Call Forward Drop-down Options” below. |
|
Call Forwarding On Active |
Forward calls to the number specified when you have one or more calls active. See “Call Forward Drop-down Options” below. |
|
Call Forwarding When Busy |
Forwards calls to the number specified when your extension has used all available call paths. See “Call Forward Drop-down Options” below. |
|
Call Forwarding When Unanswered |
Forwards calls to the number specified if the call is not answered after the specified ring timeout. See “Call Forward Drop-down Options” below. |
|
Call Forwarding When Offline |
Automatically forwards if your desk phone loses communication (such as during a power outage). See “Call Forward Drop-down Options” below. |
|
Simultaneous ring |
Rings many phones at once. Check box options allow you to: · Include the user’s extension. · Ring all your user’s phones. · Use the option “Answer confirmation for offnet numbers” to ensure that a person — and not voicemail — answers simrings to a cell/landline by prompting the answering party to press 1 to accept the call. An icon to the right of this option allows you to specify a ring delay. Note: A simring rings handsets, not users. So, for example, if 111 is listed, the simring will ring handset 111. If user 111 has a call forward set to their cell, however, the simring will not occur at the cell since simring rings handsets, not users. |
|
Just ring user’s extension |
Rings just your phone. |
Call Forward Drop-down Options
When entering an extension as a call forward option, a drop-down list allows you to forward the call to specific resources associated with that extension. Table 2‑4 describes the options. Some options may not appear, depending on the features associated with the extension.
Call Forward Drop-down Options on the Add an Answering Rule Page
|
Field |
Description |
|
Handset |
Bypasses the user answering rules and forwards to the handset associated with the specified user. |
|
User |
Forwards to the user at that extension and follows the user’s answering rules. |
|
Voicemail |
Forwards to voicemail at the specified extension. |
|
Queue |
Forwards to the queue associated with that user. |
|
Autoattendant |
Forwards to the auto attendant associated with that user. |
|
Conference |
Forwards to a Conference bridge |
Ring Timeout
At the top of the page is the ring timeout selection. This option specifies the number of seconds that your phones will ring or forwarding rule before going to voicemail (when available).
Allowing or Blocking Callers
The Answering Rules page has an Allow/Block button that allows you to permit or block calls from certain numbers. Using this feature, you can block unwanted calls to your phone, as well as calls from anonymous and unwanted numbers. Allowed numbers bypass user Do Not Disturb and Call Screening rules to ring through immediately.
1. From the Answering Rules page, click Allow/Block.
The Allow/Block page appears. This page has two lists, one for allowed phone numbers (on the left) and another for blocked phone numbers (on the right).

2. To allow phone numbers, perform the following steps under ALLOWED NUMBERS:
a. Click in the Enter a number field.
b. Enter the number you want to allow.
c. Click the ![]() button. The number appears in the ALLOWED NUMBERS list and a brief message tells you the allowed number was added.
button. The number appears in the ALLOWED NUMBERS list and a brief message tells you the allowed number was added.
d. To add more numbers, repeat step 2.
e. To remove a number, click the ![]() button next to that number.
button next to that number.
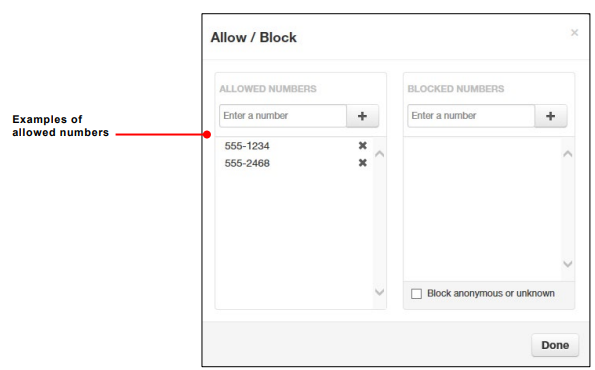
3. To block phone numbers, perform the following steps under BLOCKED NUMBERS:
a. Click in the Enter a number field.
b. Enter the number you want to block.
c. Click the ![]() button. The number appears in the BLOCKED NUMBERS list and a brief message tells you the blocked number was added.
button. The number appears in the BLOCKED NUMBERS list and a brief message tells you the blocked number was added.
d. To add more numbers, repeat step 3.
e. To remove a number, click the ![]() button next to that number.
button next to that number.
4. To block anonymous calls and calls from unknown numbers, check Block anonymous or unknown.
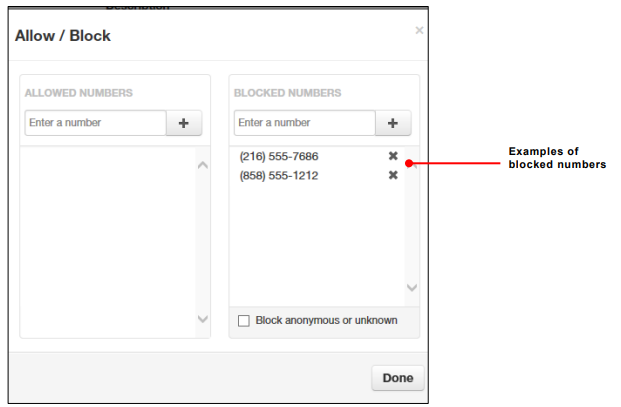
5. When you are finished, click Done.
Updating Phone Buttons (Speed Dials & BLF)
Introduction
This short guide helps you customize the keys for your desk phone, things like Speed Dials and Busy Lamp Field (BLF) lights, using the self‑service user portal.
What you can do with this guide:
-
Add or change Speed Dial buttons for extensions or external numbers
-
Add BLF keys to see coworker status (idle/ringing/on a call) and optionally pick up their ringing calls
-
Reorder keys and manage sidecar/expansion modules
Time required: About 3–5 minutes per phone once you have the portal link and login. If your company locks button editing, you may see read‑only screens, use the request template at the end and IT can apply the changes for you.
Before you start
-
What you’ll need:
-
Your portal URL (e.g.,
https://pbx.precision-computer.com) -
Your username and password (Username will generally be your ext@companyname)
-
Your desk phone powered on and connected
-
-
What these do:
-
Speed Dial: Press to instantly call a number or to transfer a call to that number.
-
BLF: A light that shows a coworker’s line status (idle/ringing/on a call) and lets you pick up or speed dial them or transfer calls to them.
-
Tip: Button names vary slightly by brand (Poly, Yealink, Cisco, Grandstream) and by portal skin. Look for Buttons, Line Keys, Programmable Keys, or Phone Settings.
Office Managers will have different Home page then basic users, refer to Office Manager: Updating Phone Buttons (Speed Dials & BLF)
1. Log in and find your phone
-
Open the portal: Go to https://pbx.precision-computer.com and Sign In.
-
on Home page on the right side, you will see a box, "Active Phones", next to your desk phone you will have a gear icon, click on the gear icon to manage the phone layout and buttons using Button Builder.

Cordless phones usually do not have layouts that can be edited and will not show the gear icon
Part B: Add a Speed Dial button
-
Click on an empty Key slot.
-
Type or select Speed Dial (sometimes called BLF/Speed Dial or Favorite).

-
Number/Value/Target: Enter the extension (e.g.,
203) or full phone number (e.g.,15555551234). - Label: Type the button name you want to see on your phone (e.g., HR, Chris, Support).
-
(Optional) Account/Line: If asked, leave as Line 1 unless you use multiple lines.
-
Click Save (or Apply).
Quick check: If your phone screen shows pages (1/2/3), pick a Page, Row, or Key number if the portal asks for it.
Part C: Add a BLF (Busy Lamp Field) button
-
Click on an empty Key slot.
-
Type/Function: choose BLF or User BLF.
-
Extension/Monitored User/Value: Enter the coworker’s extension (e.g., 203).
-
Label: (Optional) Enter the coworker’s name (e.g., Chris B), if left blank system will use name assigned to extension.
-
Click Save (or Apply).
The light will show: Green = idle, Blinking Red = ringing, Solid Red = on a call, Gray/off = no status or error (exact behavior varies by phone brand).
Part D: Reorder or move buttons
-
Drag and drop by dragging the Key number to place a button in a specific spot.
-
If you have a sidecar/expansion module, be sure you are editing the correct Module (1, 2, …) and Page.
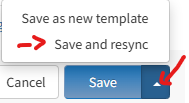
2. Send changes to your phone
-
Click Save/Apply in the portal first.
-
Push the update to your phone using any one of these (depends on your portal/phone):
-
Save and Resync button, which is visible when clicking arrow next to the Save button.

-
Reboot the phone from the portal.
-
Manual reboot: Unplug power (or network if PoE), wait 5 seconds, plug back in. Or pressing reboot menu option on the phone itself.
-
-
Wait ~1–2 minutes for the phone to pull the new config. The new labels should appear.
Common examples
-
Speed Dial to external number:
-
Type: Speed Dial
-
Label: Help Desk
-
Number:
16608271500
-
-
BLF for coworker at extension 214:
-
Type: BLF (or BLF/Speed Dial)
-
Label: Alicia
-
Extension/Monitored:
214
-
Troubleshooting
Quick Reference (Cheat Sheet)
-
Portal path: Devices/Phones → Buttons/Keys
-
Speed Dial: Label + Number (ext or E.164)
-
BLF: Label + Extension (enable Pickup if desired)
-
Push to phone: Save → Resync/Reboot → Wait ~1–2 min
-
Sidecar: Pick Module + Page before placing keys
Optional: Popular phone brand notes
-
Poly/Polycom: BLF is Busy Lamp Field; pickup often called Directed Pickup. Keys may be under Line Key vs Soft Key tabs.
-
Yealink: Look for DSS Keys; BLF is BLF or BLF List; pages 1–3 map to screen pages and sidecars.
-
Cisco/Grandstream: Similar wording; ensure you’re placing keys on Line Keys (not Soft Keys) for persistent buttons.
Need IT to do it for you? (Template to send)
Please add/modify my phone buttons:
Device:
Sidecar: <yes/no & which>
Key 1: BLF – Alicia (214), Pickup enabled
Key 2: Speed Dial – Help Desk (+1 660 827 1500)
Please resync my phone when done. Thanks!
Send to Support@Precision-Computer.com
You’re done! Your new Speed Dial/BLF keys should now appear on your phone. If something looks off, use the Troubleshooting section above or contact IT.
Mobile and Desktop Apps
Download Links
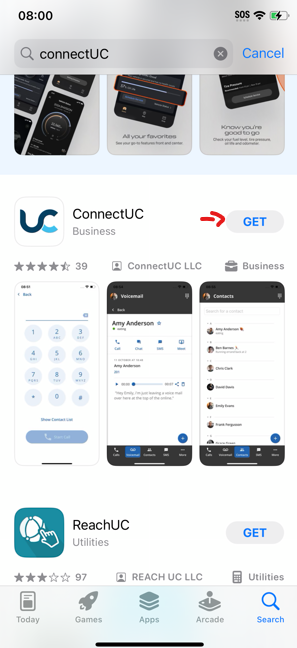
ConnectUC
Android: https://play.google.com/store/apps/details?id=io.connectuc.android

iOS: https://apps.apple.com/us/app/connectuc/id6452840138

Desktop: login to https://app.connectuc.io/ and allow popup to setup browser app
Setup ConnectUC Mobile App
Download App

You may Use the following Links:
Android: https://play.google.com/store/apps/details?id=io.connectuc.android
iOS: https://apps.apple.com/us/app/connectuc/id6452840138
Or Simply Visit your Mobile AppStore or PlayStore and search "ConnectUC"
Setting up App:
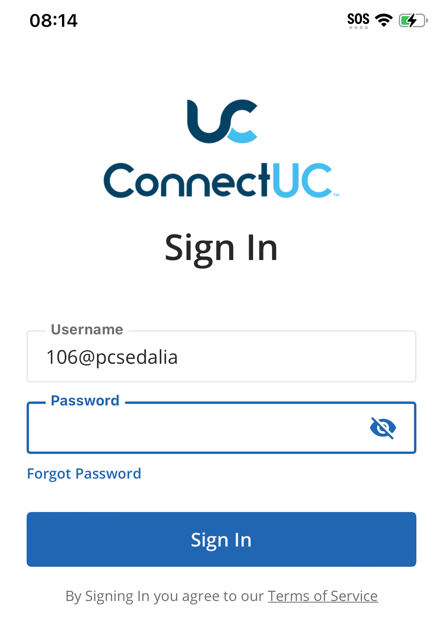
- Open the App

- Login using your PBX Credentials
*Usually you will get welcome email when your office phone is setup and will contain your user name and link to setup the password.
**Generally the username is your ext# then @ and name (Does not have a .com, .net, or anything at the end and not an email address) for Example: 101@BusinessInitalsORname
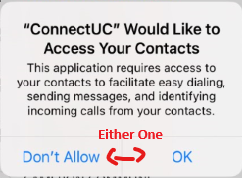
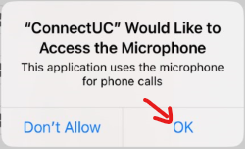
*You may request from Support to send you a new welcome email to reset your password and get your username. - Upon First Login, you will be asked for Permissions,
-

Notifications are needed if you want your phone to ring for calls or get notifications for messages and voicemails. -

Your Preference: This will only help you to call easier by selecting contacts, none of your phone contacts should be uploading to cloud/server, it should all be only locally to your phone. -

Required: if you want the other caller to hear you, without Microphone access, you will hear them, but they won't hear you.
-
- That's it, your logged in and ready to use the app. Keep in mind that by default you will only get calls on your mobile phone that are directly dialing your extension. If you want to get calls from normal Call Queue, then contact support to add your mobile device to get the Call Queue Calls as well


Troubleshooting:
Common Issues and Basic Troubleshooting steps to fix them.
I'm Not seeing any calls come through:
There are several reasons you may not see the calls coming in on your phone...
- Logged out of the App
- Forgot to re-setup app on your new smartphone
- Do Not Disturb Enabled on your Smartphone (or Focus Mode for Work, Personal, Sleep, etc)
- Calls are just not setup to be routed to your smartphone app
- You have Do Not Disturb on your Extension Enabled
- Issue/Glitches with Smartphone
Here is what you want to check in this order:
- Open ConnectUC App on your smartphone and make sure you can make an outbound call.
- If your opening the app and its logged out, or cant find the app, then make sure to download it and/or login
- Call your extension directly from another office phone, to see if you get a call
- If call goes through, then you may just not have the calls your wanting to route to your mobile phone. Not all calls are treated the same as your office phone, so calls to your mobile and office can be different. (Contact support if you want to change it or have questions)
- If call goes through, then you may just not have the calls your wanting to route to your mobile phone. Not all calls are treated the same as your office phone, so calls to your mobile and office can be different. (Contact support if you want to change it or have questions)
- Inside ConnectUC App, Click on your Initials/Profile Avatar or Picture in top Left side. And see that Do Not Disturb is turned off

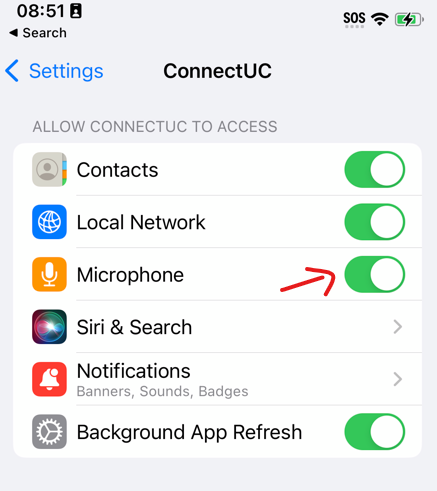
- Go to your Settings -> ConnectUC, and check that Notifications are enabled
*Newer iOS could be under, Settings -> Apps -> ConnectUC
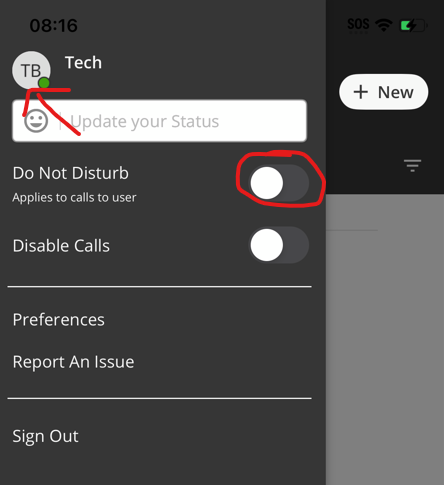
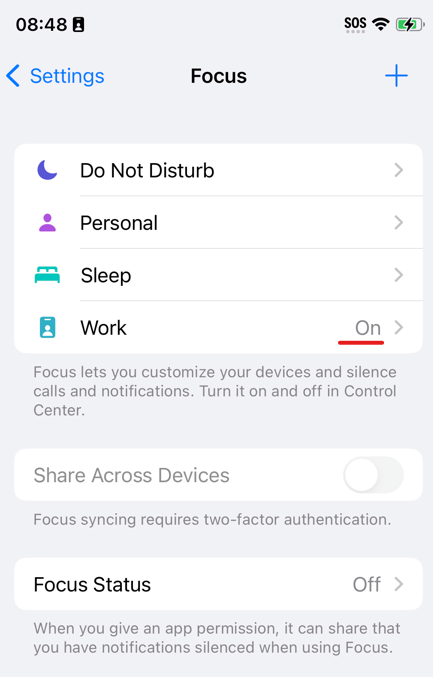
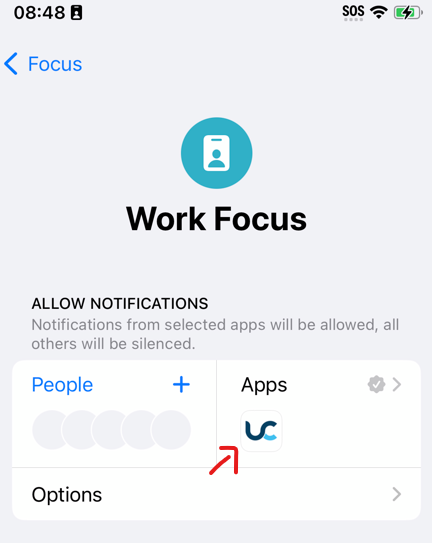
- Check if you have Do Not Disturb or Focus Mode enabled
Note: you may allow the app in those modes to still get through, by simply click on the mode and adding it to Apps List:

- If none of those worked, you may try deleting the App and Redownloading it and relogging in to see if that resolves it, and/or contact support for additional assistance in determining the issue.

No one can hear me...
This is usually do to not allowing Microphone access in permissions, if you can hear someone on the other side and they can't hear you at all, check your permissions
App keeps logging out
Some phones will deactivate notifications and log you out if you haven't used the app at all within 1-2 weeks. You may try reinstalling the app (delete it and redownload it) to see if it helps, but usually you do want to use or interact with the app at least once a week. It's not really anything we can do, its generally Smartphone manufactures try to optimize your phone for speed and efficiency.
Checking and Sending Fax on Connect UC Desktop
While you may email almost anyone, there are some that still like the traditional fax machine. Or some agencies that just refuse to update...
Checking and Sending Fax is simple, make sure it is enabled and the correct Shared Fax Number Appears, if not, you may call or text our support line or email us at support@precision-computer.com
Checking Faxes
- Open ConnectUC on your Desktop (Don't have ConnectUC on your PC, Click here to View Downloading ConnectUC)
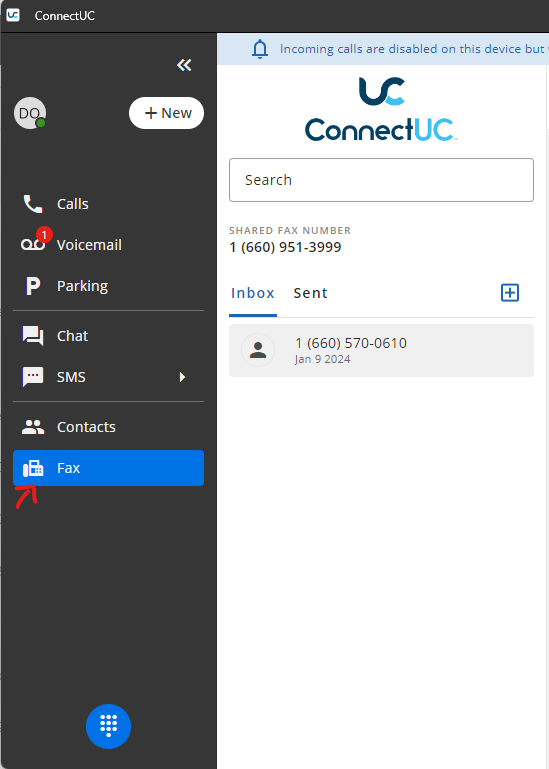
- Look for Fax on Left Sidebar

- Under Inbox, you will see all the faxes that came in recently, you Download it, Print it, or Delete it (By simply clicking the appropriate icons when viewing the fax


Sending a Fax
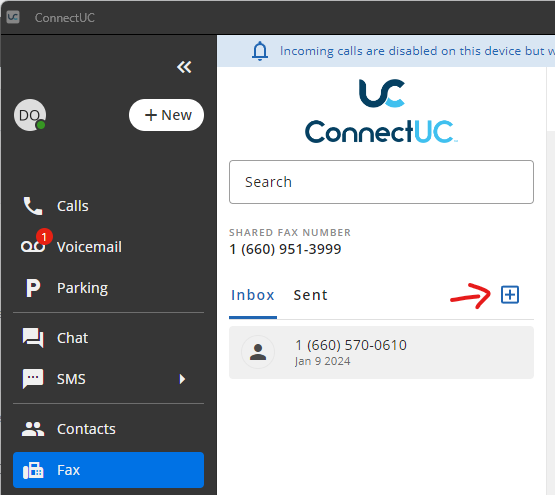
- Same as Viewing Faxes, open the ConnectUC app on your Computer and Click Fax on Sidebar
- Simply Press the + icon to get form to send a fax

- Simply Click on Up Arrow or drag your PDF (or other compatible file) on top of, to add your attachment, Fill in the Destination or choose from your Contacts, and press send. (You may add Cover page attachment or Compose one by choosing the options)

- Once you attached your document and choose your Destination, press Send.

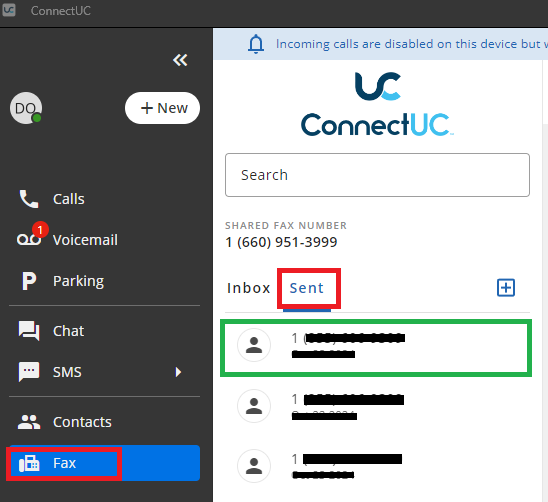
Checking Sent Faxes
Simply Click "Sent" Link in Fax, and you will see your recent sent messages
Office Manager
Updating Phone Buttons (Speed Dials & BLF)
Introduction
This short guide helps you customize the keys for your desk phone, things like Speed Dials and Busy Lamp Field (BLF) lights, using the self‑service user portal.
What you can do with this guide:
-
Add or change Speed Dial buttons for extensions or external numbers
-
Add BLF keys for user to see coworker status (idle/ringing/on a call) and optionally pick up their ringing calls
-
Reorder keys and manage sidecar/expansion modules
Time required: About 3–5 minutes per phone once you have the portal link and login. If your company locks button editing, you may see read‑only screens, use the request template at the end and IT can apply the changes for you.
Before you start
-
What you’ll need:
-
Your portal URL (e.g.,
https://pbx.precision-computer.com) -
Your username and password (Username will generally be your ext@companyname)
- Office Manager Permissions (Contact Support if needed)
-
-
What these do:
-
Speed Dial: Press to instantly call a number or to transfer a call to that number.
-
BLF: A light that shows a coworker’s line status (idle/ringing/on a call) and lets you pick up or speed dial them or transfer calls to them.
-
Tip: Button names vary slightly by brand (Poly, Yealink, Cisco, Grandstream) and by portal skin. Look for Buttons, Line Keys, Programmable Keys, or Phone Settings.
1. Log in and locate phone
There are 2 main ways you may update a specific device
Option A: Users Tab
-
Open the portal: Go to https://pbx.precision-computer.com and Sign In.
-
Go to Users Tab

- Click on The name or Pencil Icon to select user to edit

- Select Phones tab

- Select Gear Icon next to the phone you would like to edit

Cordless phones usually do not have layouts that can be edited and will not show the gear icon
- Now it will load into Button Builder where you can edit the phone layout


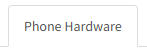
Option B: Inventory Tab
-
Open the portal: Go to https://pbx.precision-computer.com and Sign In.
-
Go to Inventory Tab

- Select Phone Hardware tab, in Inventory page.

- Select Gear Icon next to the phone you would like to edit

Cordless phones usually do not have layouts that can be edited and will not show the gear icon
- Now it will load into Button Builder where you can edit the phone layout


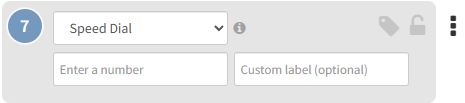
Part B: Add a Speed Dial button
-
Click on an empty Key slot.
-
Type or select Speed Dial (sometimes called BLF/Speed Dial or Favorite).
-
Number/Value/Target: Enter the extension (e.g.,
203) or full phone number (e.g.,15555551234). - Label: Type the button name you want to see on the phone (e.g., HR, Chris, Support).
-
(Optional) Account/Line: If asked, leave as Line 1 unless you use multiple lines.
-
Click Save (or Apply).
Quick check: If your phone screen shows pages (1/2/3), pick a Page, Row, or Key number if the portal asks for it.
Part C: Add a BLF (Busy Lamp Field) button
-
Click on an empty Key slot.
-
Type/Function: choose BLF or User BLF.
-
Extension/Monitored User/Value: Enter the coworker’s extension (e.g., 203).
-
Label: (Optional) Enter the coworker’s name (e.g., Chris B), if left blank system will use name assigned to extension.
-
Click Save (or Apply).
The light will show: Green = idle, Blinking Red = ringing, Solid Red = on a call, Gray/off = no status or error (exact behavior varies by phone brand).
Part D: Reorder or move buttons
-
Drag and drop by dragging the Key number to place a button in a specific spot.
-
If you have a sidecar/expansion module, be sure you are editing the correct Module (1, 2, …) and Page.
2. Send changes to the phone
-
Click Save in the portal first. Or Save and Resync.
-
Push the update to your phone using any one of these (depends on your portal/phone):
-
Save and Resync button, which is visible when clicking arrow next to the Save button.
-
Reboot the phone from the portal.
-
Manual reboot: Unplug power (or network if PoE), wait 5 seconds, plug back in. Or pressing reboot menu option on the phone itself.
-
-
Wait ~1–2 minutes for the phone to pull the new config. The new labels should appear.
Common examples
-
Speed Dial to external number:
-
Type: Speed Dial
-
Label: Help Desk
-
Number:
16608271500
-
-
BLF for coworker at extension 214:
-
Type: BLF (or BLF/Speed Dial)
-
Label: Alicia
-
Extension/Monitored:
214
-
Troubleshooting
Quick Reference (Cheat Sheet)
-
Portal path: Devices/Phones → Buttons/Keys
-
Speed Dial: Label + Number (ext or E.164)
-
BLF: Label + Extension (enable Pickup if desired)
-
Push to phone: Save → Resync/Reboot → Wait ~1–2 min
-
Sidecar: Pick Module + Page before placing keys
Optional: Popular phone brand notes
-
Poly/Polycom: BLF is Busy Lamp Field; pickup often called Directed Pickup. Keys may be under Line Key vs Soft Key tabs.
-
Yealink: Look for DSS Keys; BLF is BLF or BLF List; pages 1–3 map to screen pages and sidecars.
-
Cisco/Grandstream: Similar wording; ensure you’re placing keys on Line Keys (not Soft Keys) for persistent buttons.
Need IT to do it for you? (Template to send)
Please add/modify my phone buttons:
Device: <which extension and phone>
Sidecar: <yes/no & which>
Key 1: BLF – Alicia (214), Pickup enabled
Key 2: Speed Dial – Help Desk (+1 660 827 1500)
Please resync my phone when done. Thanks!
Send to Support@Precision-Computer.com
You’re done! Your new Speed Dial/BLF keys should now appear on the phone. If something looks off, use the Troubleshooting section above or contact IT.
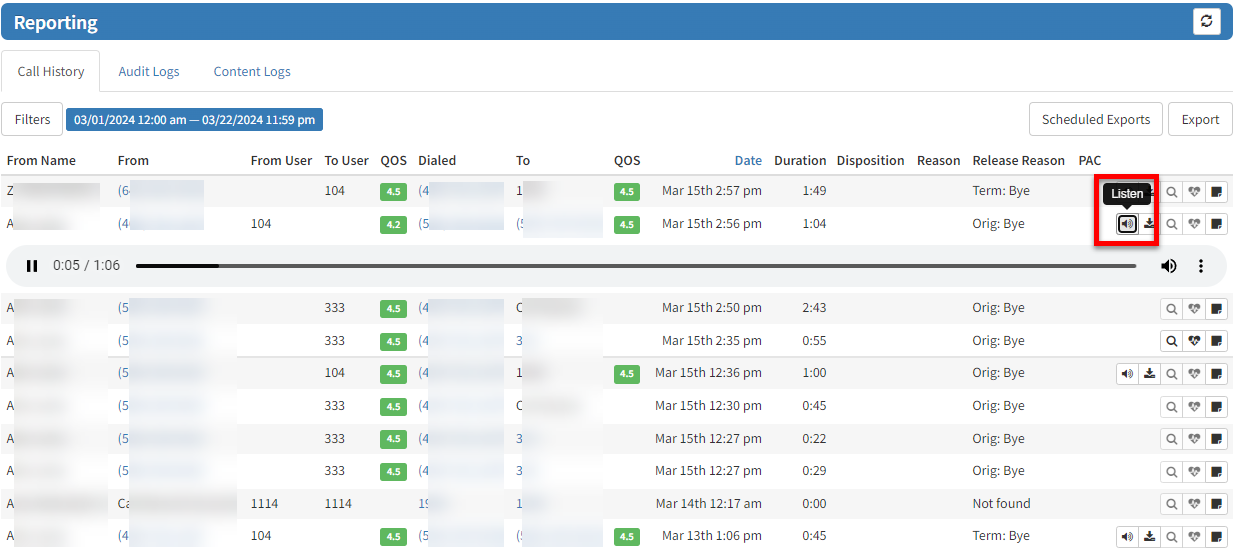
Listening to Call Recordings
All call recordings will be stored in the user's Call History/Reporting Tab within the User Portal and can be played back on the fly or downloaded. You will need to have Office Manager role to see all the recordings.
1. Login: https://pbx.precision-computer.com as Office Manager
2. Click on Reporting Tab (If you do not see it, then you don't have proper permissions)
3. Just find the call you want to playback and click Listen, see below:
Important Call Recording Conditions
There are 2 ways you can call any user on the system:
- Call their USER which will then follow the answering rules of that user (the default routing is to the user's DEVICE)
- Call the user's DEVICE directly - which will ignore the User's answering rules, and only ring the specific device.
Note: Routing to a User in a Ring Group (a.k.a Hunt Group) or Call Queue goes directly to the User's DEVICE and not to the USER.
Call Recording CONDITIONS depend on HOW the call is routed to the user.
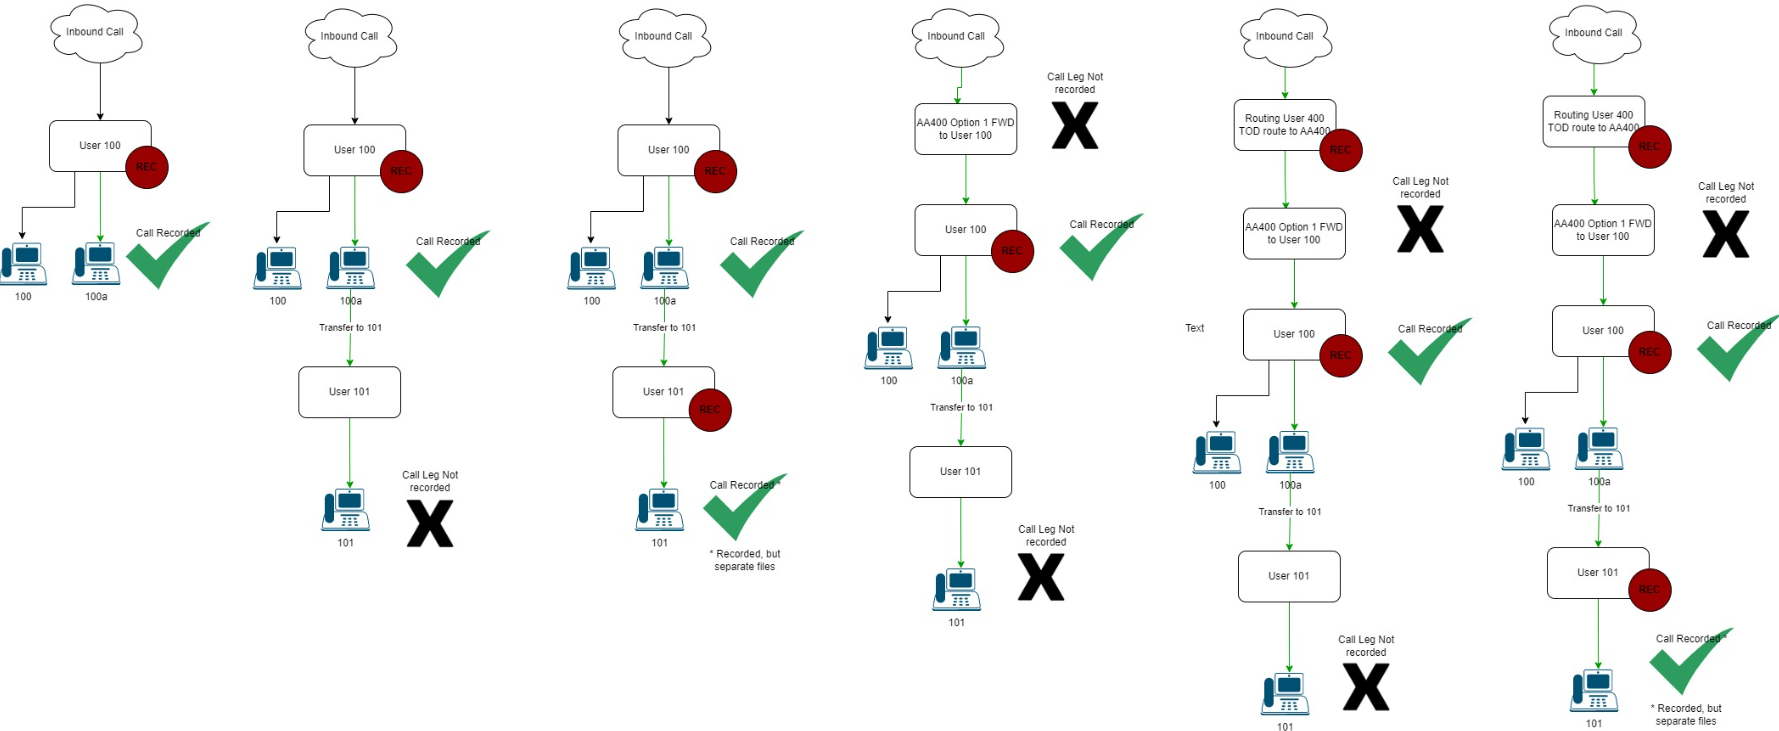
CONDITION 1: Call Recording is activated on the user's USER and DEVICE (this is done in 2 separate screens in the portal), then these conditions will result:
--- Call to DID: Yes
--- Call to Auto Attendant: Yes
--- Call transferred to extension: Yes
--- Call Parked and picked up by another extension: Yes
--- Call into Ring Group: Yes
--- Call into Call Queue: Yes
CONDITION 2: Call Recording is activated on the user's USER and not the DEVICE, then:
--- Call to DID: Yes if the DID is routed to the USER
--- Call to Auto Attendant: Yes if the AA is routed to the USER.
--- Call transferred to extension: Yes
--- Call Parked and picked up by another extension: Yes
--- Call into Ring Group: No
--- Call into Call Queue: No
CONDITION 3: Call Recording is activated on the user's DEVICE and not the USER, then:
--- Call to DID: Yes, but only if the answering rules for USER are routed to the DEVICE.
--- Call to Auto Attendant: Yes, but only if the answering rules for USER are routed to the DEVICE.
--- Call transferred to extension: Yes, but only if the answering rules for USER are routed to the DEVICE.
--- Call Parked and picked up by another extension: Yes, but only if the answering rules for USER are routed to the DEVICE.
--- Call into Ring Group: Yes
--- Call into Call Queue: Yes
If you are missing a recording, you may contact support to request recording. There is a limited window to recover a missing recording.