USING THE USER WEB PORTAL
Each extension of your Cloud PBX system has
access to a powerful web portal for managing
voicemail, call routing, and more.
- Accessing the Portal
- Desktop Call Control
- Home
- Voicemail
- Time Frames
- Answering Rules
- Updating Phone Buttons (Speed Dials & BLF)
Accessing the Portal
To access the web portal
1. Start a web browser.
2. Go to https://pbx.precision-computer.com
3. At the login page:
• Enter your Login Name (ext@customerpbxname) and Password. If you do not know your Login Name or Password use the applicable Forgot Link.
• If you never received these details use the New User link

Desktop Call Control
Desktop call controls appear when making or receiving a call. These controls allow you to see who is calling and manage a current call.
Incoming Calls
Incoming calls appear in a window in the portal. This window shows the caller ID name and number, along with Reject and Answer buttons.
• Selecting Reject sends the call to voicemail if available. The Answer button may not be available, depending upon your handset model.
 Example of an Incoming Call
Active Calls
An active call window that displays the caller ID and call time. The three controls at the bottom of the window let you hold, hang up, or transfer the call. If you select transfer, a field appears for entering the extension of the recipient. If you prefix the recipient’s extension number with 03, the call goes straight to voicemail.

Home
The Home page of your portal provides an at-a-glance view of everything going on with your extension. Table 2 1 describes the areas on the Home page.


Figure 2 3. Example of Home Page
Table 2 1. Fields in the Home Page
|
Field |
Description |
|
New Messages |
Shows new messages. You can play messages, click to call back, download, save, and delete. To see all the controls, hover over the message. |
|
Recent Call History |
Color-coded icons show your recent calls. · Green icon = outbound call. · Red icon = missed inbound calls. · Blue icon = inbound received calls. To call back a number, click the phone number. |
|
Status Message |
Allows you to enter a status message that appears to other users of the portal. |
|
Active Answering Rule |
Your extension can have multiple answering rules. For example, you might ring your phone in one mode or forward to your cell in another mode. In this field, you can which answering rule is the active rule. |
|
Active Phones |
Your extension may have multiple phones (for example, one in the office and one at home). This field shows which handsets are currently online. |
Voicemail
You configure voicemail using the Messages page. This page has two tabs for handling voicemail:
• Messages — see “Messages” below.
• Settings — see “Voicemail Settings” on the next page.
To display the Messages page, click the Messages icon at the top of the page:

Messages
The Messages tab allows you to manage your new, saved, and deleted voicemail, as well as greetings and other settings.

Like the Home page, you can play messages, click a number to call it back, and download, save, forward, and delete messages. To see all the controls available, hover the mouse pointer over a message.
The New drop-down list allows you to review New, Saved, and Trash (recently deleted) messages.

Voicemail Settings
Clicking the Settings tab displays options for controlling your voicemail order, timestamps, greetings, and voicemail to email.

|
Field |
Description |
|
Enable Voicemail check box |
Enables (check) or disables (uncheck) voicemail. |
|
Inbox |
These options affect audio voicemail (calling in) but not the portal. · Sort Voicemail inbox by latest first = plays your newest messages first. · Announce voicemail received time = plays the timestamp of the message. · Announce incoming call ID = plays the caller ID number if available. · Operator Forward = option to press 0 in a mailbox greeting and be directed elsewhere. |
|
Greetings |
Allows you to select an active voicemail greeting, listen to it, and record a new greeting. · To select the active voicemail greeting, click it from the pull-down menu and click Save. · To listen to a selected greeting on your PC, click the play button: · To record a greeting, see “Recording a Greeting”. |
Recording a Greeting
Ø To record a greeting
1. From the Settings tab of the Messages page, click the speaker icon ![]() .
.
A Manage Greetings page similar to the one below appears.

2. Next to New Greeting, click Record.
The Browse button changes to a Call me at field.
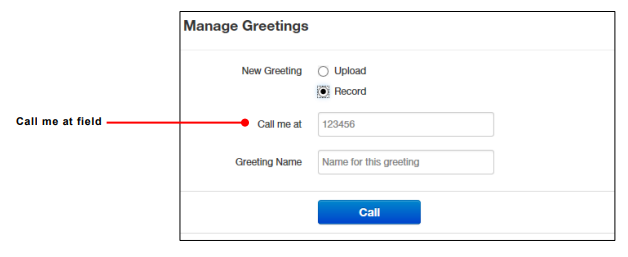
3. In the Call me at field, enter a number to call. This can be an extension or a telephone
number such as your cell phone.
4. In the Greeting name field, enter a name for this greeting.
5. Click the Call button.
6. At the prompt, record the new greeting. When you finish the greeting, press #.
7. Click Add Greeting at the bottom of the Manage Greetings page, and then click Done to
close the page.
Uploading a Greeting
Ø To upload a greeting
- From the Settings tab of the Messages page, click the speaker icon
 .
. - Hover over a greeting. Options appear for editing, deleting, or renaming the greeting.
- Next to New Greeting, click Upload.
- Click the Browse button.
- In the Choose File to Upload dialog box, select a WAV or MP3 recording from your PC,
and then click Open.
The path and file name appear in the Browse field. - Click Upload.
- Click Add Greeting at the bottom of the Manage Greetings page, and then click Done to
close the page
Recorded Name
If your company has a dial-by-name directory, you must record your name for the directory
to be found. You can click the play button to listen to your current name recording on your
PC, or click the speaker button to record or upload a new name recording.
Time Frames
Time frames allow you to control the scheduling of the system. You configure time frames
using the Time Frames page. To display this page, click the Time Frames icon at the top of
the page:

Three common time frames are:
• Open Hours (for example, M-F 9am-5pm)
• Holidays (Independence Day, Thanksgiving, New Year’s, and so on)
• Closed Hours (all other times)
Time frames can be both shared (system-wide and set by the administrator) or personal to
your extension. You can add a time frame to your extension by clicking the Add Time Frame.

Ø To add time frames
1. From the Time Frames page, click Add Time Frame.
The Add a Timeframe page appears.

2. In the Name field, enter a name for this time frame.
3. Next to When, select the time period when the time frame will be applied:
– Always = select this option if the time frame will always be applied. Click Save to complete the procedure.
– Days of the week and times = select this option to select days and times when the time frame will be applied. Proceed to “If you select Days of the week and times” on page 23.
– Specific dates or ranges = select this option to specify a specific date or range of dates. Proceed to “If you select Specific dates or ranges” on page 27.
If you select Days of the week and times
Options appear for selecting days and times when the time frame will be applied.

1. Using the check boxes next to the name of each day of the week, check the days when the time frame will be applied. A blue line to the right of checked day shows the default hours for this time frame (9:00 AM through 5:00 PM).

2. To change the start time, drag the button on the left side of the blue bar either to the left to begin the start time earlier or to the right to begin the start time later.

3. To change the end time, drag the button on the right side of the blue bar either to the left to shorten the end time or to the right to lengthen the end time.
![]()
Hint: To fine-tune start and end times, click start time or end time button, and then use the left and right arrow keys on your keyboard to change the time in 5-minute increments.
4. By default, each day is made up of one time period. However, you can use the icon to define two time periods per day. For example, the figure below shows a setup for an office that answers calls in the morning and afternoon, and then transfers calls to an answering service over lunch, on Monday through Friday. By doing this, you would create two time frames (for example, one from 8 to noon and another from 1:00 to 5:00 PM).

5. Click Save to save your selections.
The time frame appears as a row on the Time Frames page.

Hint: Moving the pointer over the blue text in the Description column shows the settings for that timeframe.

If you select Specific dates or ranges
Fields appear for entering dates or ranges

1. Click in the left field, and then select a starting date and time from the pop-up calendar.

2. Click in the right field, and then select an ending date and time from the pop-up calendar.
3. To specify additional ranges, click the icon to display another row of fields, and then repeat steps 1 and 2 in the new fields. Repeat this step for each additional date or range you want to specify. To delete a date or range, click the icon next to the appropriate row.

4. Click Save to save your selections.
The time frame appears as a row on the Time Frames page.

Hint: Moving the pointer over the blue text in the Description column shows the settings for that timeframe.

Answering Rules
After you set up your time frames, you can create different answering rules for your time frames. You configure answering rules using the Answering Rules page. To display this page, click the Answering Rules icon at the top of the page:

The left side of the Answering page has a Rings for n seconds drop-down list that allows you to specify the maximum ring time (one ring is generally 5 seconds). When that time expires, the caller will be forwarded to the Call Forward When Unanswered rule if defined; otherwise, the caller will be forwarded to voicemail if enabled. The right side of the Answering Rules page has buttons for adding answering rules, and specifying allowed and blocked numbers.

Shows examples of answering rules. In this figure:
· The extension has a rule to simultaneously ring many desk phones during Open Hours.
· Cell Forward rings many desk phones and a cell phone simultaneously.
· Holiday and closed hour rules go straight to voicemail.
The active rule is the topmost rule that matches the conditions in the corresponding time frame. For example, the time is around 1pm on Friday, so both Open Hours and Cell Forward rule match the time/day condition, but Open Hours is active because it is the topmost rule. You can change the order by using the arrows at left of each rule to drag the rules.
Sample Answering Rules
Ø To add an answering rule
1. From the Answering Rules page, click Add Rule.
The Add an Answering Rule page appears. From this page, you can create rules to screen callers, forward calls, and ring multiple numbers simultaneously.

Add an Answering Rule Page
2. Complete the fields in the Add an Answering Rule page (see Table 2‑3).
3. Click Save
Fields in the Add an Answering Rule Page
|
Field |
Description |
|
Time Frame |
Select the time frame when this answering rule will apply. |
|
Do not disturb |
No phone rings, goes straight to voicemail if available. |
|
Call screening |
Prompts caller to say their name, lets you screen the call before accepting. |
|
Call Forwarding Always |
Immediately forwards to the number specified. See “Call Forward Drop-down Options” below. |
|
Call Forwarding On Active |
Forward calls to the number specified when you have one or more calls active. See “Call Forward Drop-down Options” below. |
|
Call Forwarding When Busy |
Forwards calls to the number specified when your extension has used all available call paths. See “Call Forward Drop-down Options” below. |
|
Call Forwarding When Unanswered |
Forwards calls to the number specified if the call is not answered after the specified ring timeout. See “Call Forward Drop-down Options” below. |
|
Call Forwarding When Offline |
Automatically forwards if your desk phone loses communication (such as during a power outage). See “Call Forward Drop-down Options” below. |
|
Simultaneous ring |
Rings many phones at once. Check box options allow you to: · Include the user’s extension. · Ring all your user’s phones. · Use the option “Answer confirmation for offnet numbers” to ensure that a person — and not voicemail — answers simrings to a cell/landline by prompting the answering party to press 1 to accept the call. An icon to the right of this option allows you to specify a ring delay. Note: A simring rings handsets, not users. So, for example, if 111 is listed, the simring will ring handset 111. If user 111 has a call forward set to their cell, however, the simring will not occur at the cell since simring rings handsets, not users. |
|
Just ring user’s extension |
Rings just your phone. |
Call Forward Drop-down Options
When entering an extension as a call forward option, a drop-down list allows you to forward the call to specific resources associated with that extension. Table 2‑4 describes the options. Some options may not appear, depending on the features associated with the extension.
Call Forward Drop-down Options on the Add an Answering Rule Page
|
Field |
Description |
|
Handset |
Bypasses the user answering rules and forwards to the handset associated with the specified user. |
|
User |
Forwards to the user at that extension and follows the user’s answering rules. |
|
Voicemail |
Forwards to voicemail at the specified extension. |
|
Queue |
Forwards to the queue associated with that user. |
|
Autoattendant |
Forwards to the auto attendant associated with that user. |
|
Conference |
Forwards to a Conference bridge |
Ring Timeout
At the top of the page is the ring timeout selection. This option specifies the number of seconds that your phones will ring or forwarding rule before going to voicemail (when available).
Allowing or Blocking Callers
The Answering Rules page has an Allow/Block button that allows you to permit or block calls from certain numbers. Using this feature, you can block unwanted calls to your phone, as well as calls from anonymous and unwanted numbers. Allowed numbers bypass user Do Not Disturb and Call Screening rules to ring through immediately.
1. From the Answering Rules page, click Allow/Block.
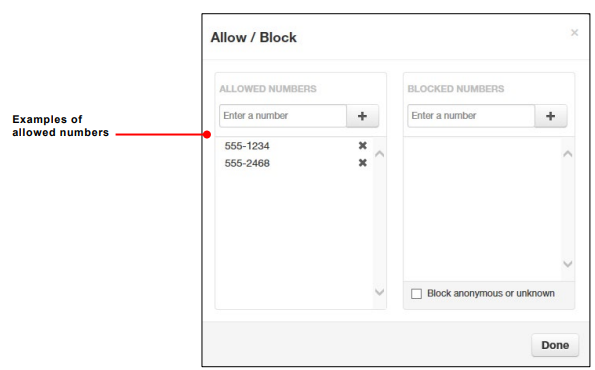
The Allow/Block page appears. This page has two lists, one for allowed phone numbers (on the left) and another for blocked phone numbers (on the right).

2. To allow phone numbers, perform the following steps under ALLOWED NUMBERS:
a. Click in the Enter a number field.
b. Enter the number you want to allow.
c. Click the ![]() button. The number appears in the ALLOWED NUMBERS list and a brief message tells you the allowed number was added.
button. The number appears in the ALLOWED NUMBERS list and a brief message tells you the allowed number was added.
d. To add more numbers, repeat step 2.
e. To remove a number, click the ![]() button next to that number.
button next to that number.
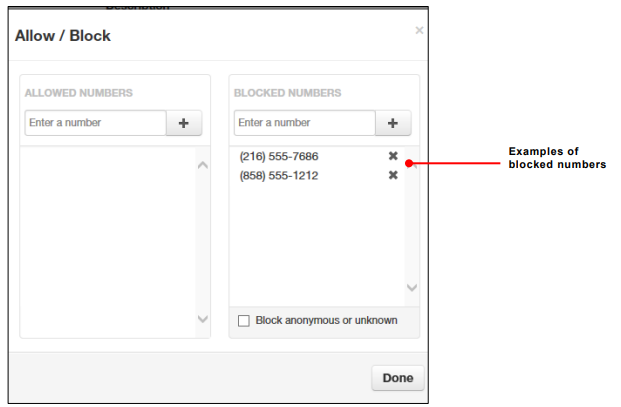
3. To block phone numbers, perform the following steps under BLOCKED NUMBERS:
a. Click in the Enter a number field.
b. Enter the number you want to block.
c. Click the ![]() button. The number appears in the BLOCKED NUMBERS list and a brief message tells you the blocked number was added.
button. The number appears in the BLOCKED NUMBERS list and a brief message tells you the blocked number was added.
d. To add more numbers, repeat step 3.
e. To remove a number, click the ![]() button next to that number.
button next to that number.
4. To block anonymous calls and calls from unknown numbers, check Block anonymous or unknown.
5. When you are finished, click Done.
Updating Phone Buttons (Speed Dials & BLF)
Introduction
This short guide helps you customize the keys for your desk phone, things like Speed Dials and Busy Lamp Field (BLF) lights, using the self‑service user portal.
What you can do with this guide:
-
Add or change Speed Dial buttons for extensions or external numbers
-
Add BLF keys to see coworker status (idle/ringing/on a call) and optionally pick up their ringing calls
-
Reorder keys and manage sidecar/expansion modules
Time required: About 3–5 minutes per phone once you have the portal link and login. If your company locks button editing, you may see read‑only screens, use the request template at the end and IT can apply the changes for you.
Before you start
-
What you’ll need:
-
Your portal URL (e.g.,
https://pbx.precision-computer.com) -
Your username and password (Username will generally be your ext@companyname)
-
Your desk phone powered on and connected
-
-
What these do:
-
Speed Dial: Press to instantly call a number or to transfer a call to that number.
-
BLF: A light that shows a coworker’s line status (idle/ringing/on a call) and lets you pick up or speed dial them or transfer calls to them.
-
Tip: Button names vary slightly by brand (Poly, Yealink, Cisco, Grandstream) and by portal skin. Look for Buttons, Line Keys, Programmable Keys, or Phone Settings.
Office Managers will have different Home page then basic users, refer to Office Manager: Updating Phone Buttons (Speed Dials & BLF)
1. Log in and find your phone
-
Open the portal: Go to https://pbx.precision-computer.com and Sign In.
-
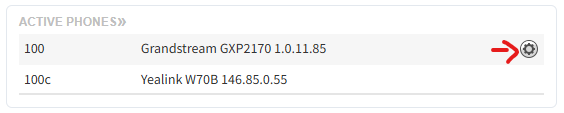
on Home page on the right side, you will see a box, "Active Phones", next to your desk phone you will have a gear icon, click on the gear icon to manage the phone layout and buttons using Button Builder.

Cordless phones usually do not have layouts that can be edited and will not show the gear icon
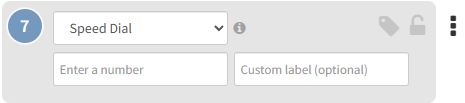
Part B: Add a Speed Dial button
-
Click on an empty Key slot.
-
Type or select Speed Dial (sometimes called BLF/Speed Dial or Favorite).

-
Number/Value/Target: Enter the extension (e.g.,
203) or full phone number (e.g.,15555551234). - Label: Type the button name you want to see on your phone (e.g., HR, Chris, Support).
-
(Optional) Account/Line: If asked, leave as Line 1 unless you use multiple lines.
-
Click Save (or Apply).
Quick check: If your phone screen shows pages (1/2/3), pick a Page, Row, or Key number if the portal asks for it.
Part C: Add a BLF (Busy Lamp Field) button
-
Click on an empty Key slot.
-
Type/Function: choose BLF or User BLF.
-
Extension/Monitored User/Value: Enter the coworker’s extension (e.g., 203).
-
Label: (Optional) Enter the coworker’s name (e.g., Chris B), if left blank system will use name assigned to extension.
-
Click Save (or Apply).
The light will show: Green = idle, Blinking Red = ringing, Solid Red = on a call, Gray/off = no status or error (exact behavior varies by phone brand).
Part D: Reorder or move buttons
-
Drag and drop by dragging the Key number to place a button in a specific spot.
-
If you have a sidecar/expansion module, be sure you are editing the correct Module (1, 2, …) and Page.
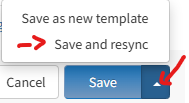
2. Send changes to your phone
-
Click Save/Apply in the portal first.
-
Push the update to your phone using any one of these (depends on your portal/phone):
-
Save and Resync button, which is visible when clicking arrow next to the Save button.

-
Reboot the phone from the portal.
-
Manual reboot: Unplug power (or network if PoE), wait 5 seconds, plug back in. Or pressing reboot menu option on the phone itself.
-
-
Wait ~1–2 minutes for the phone to pull the new config. The new labels should appear.
Common examples
-
Speed Dial to external number:
-
Type: Speed Dial
-
Label: Help Desk
-
Number:
16608271500
-
-
BLF for coworker at extension 214:
-
Type: BLF (or BLF/Speed Dial)
-
Label: Alicia
-
Extension/Monitored:
214
-
Troubleshooting
Quick Reference (Cheat Sheet)
-
Portal path: Devices/Phones → Buttons/Keys
-
Speed Dial: Label + Number (ext or E.164)
-
BLF: Label + Extension (enable Pickup if desired)
-
Push to phone: Save → Resync/Reboot → Wait ~1–2 min
-
Sidecar: Pick Module + Page before placing keys
Optional: Popular phone brand notes
-
Poly/Polycom: BLF is Busy Lamp Field; pickup often called Directed Pickup. Keys may be under Line Key vs Soft Key tabs.
-
Yealink: Look for DSS Keys; BLF is BLF or BLF List; pages 1–3 map to screen pages and sidecars.
-
Cisco/Grandstream: Similar wording; ensure you’re placing keys on Line Keys (not Soft Keys) for persistent buttons.
Need IT to do it for you? (Template to send)
Please add/modify my phone buttons:
Device:
Sidecar: <yes/no & which>
Key 1: BLF – Alicia (214), Pickup enabled
Key 2: Speed Dial – Help Desk (+1 660 827 1500)
Please resync my phone when done. Thanks!
Send to Support@Precision-Computer.com
You’re done! Your new Speed Dial/BLF keys should now appear on your phone. If something looks off, use the Troubleshooting section above or contact IT.